Adobe Premiere Pro Tutorial #2: Adjusting the Timebar
Adobe Premiere Pro Tutorial #2: Time Bar
Your task: Learn about the Time Bar. Set up length of video and playback video.
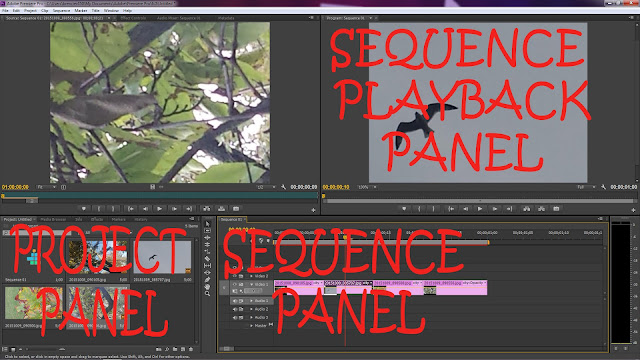
1. The Sequence Panel is where you will edit video, shorten frame times, create Titles, etc. Click on it to activate it, there should be an orange border around it after clicking.

2. From the previous tutorial, you now have 4 photos (also called frames) on the Video 1 Bar in the Sequence Panel. Make sure they are side by side, not overlapping and with no space between them. Like this:

3. See how time is displayed: time shows as 00;00;00;00, which is hours;minutes;seconds;milliseconds. This is very important. Shorten the grey bar at the top to 1 second (00;00;01;00). You may need to zoom in or out to see such a short time.
4. Now shorten each frame to be about a quarter of a second long each. As you scroll over top of the ends of each frame a red arrow will display. Once that shows click and hold to drag the frame length.
5. Move the Current Time Indicator (CTI) to the beginning of your footage. Hit the Spacebar on your keyboard to view the video in the Sequence Playback Panel. Hitting Spacebar again also pauses the playback.
*TIP* Are your photos too big in the Sequence Playback Panel? Is the full photo not displaying? To fix this, double click the photo in the Sequence Playback Panel, then drag it down until you can see a corner of it. Click on the corner of the photo and drag it to become a smaller size. Move the photo until it fits in the Sequence Playback screen.
Your task: Learn about the Time Bar. Set up length of video and playback video.
1. The Sequence Panel is where you will edit video, shorten frame times, create Titles, etc. Click on it to activate it, there should be an orange border around it after clicking.

2. From the previous tutorial, you now have 4 photos (also called frames) on the Video 1 Bar in the Sequence Panel. Make sure they are side by side, not overlapping and with no space between them. Like this:

3. See how time is displayed: time shows as 00;00;00;00, which is hours;minutes;seconds;milliseconds. This is very important. Shorten the grey bar at the top to 1 second (00;00;01;00). You may need to zoom in or out to see such a short time.
4. Now shorten each frame to be about a quarter of a second long each. As you scroll over top of the ends of each frame a red arrow will display. Once that shows click and hold to drag the frame length.
5. Move the Current Time Indicator (CTI) to the beginning of your footage. Hit the Spacebar on your keyboard to view the video in the Sequence Playback Panel. Hitting Spacebar again also pauses the playback.
*TIP* Are your photos too big in the Sequence Playback Panel? Is the full photo not displaying? To fix this, double click the photo in the Sequence Playback Panel, then drag it down until you can see a corner of it. Click on the corner of the photo and drag it to become a smaller size. Move the photo until it fits in the Sequence Playback screen.


No comments:
Post a Comment